
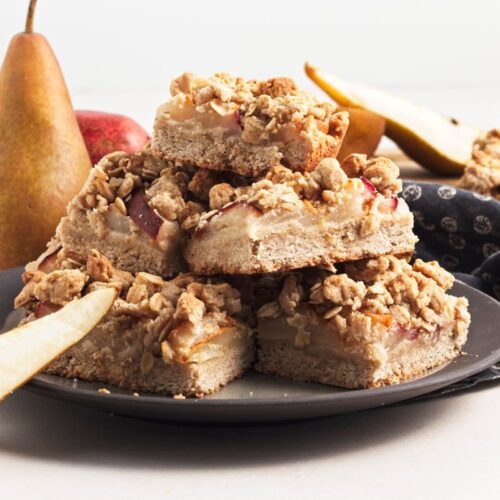
There’s something about crumble bars that instantly makes them feel homemade. Whether you serve them for dessert, pack them into a lunchbox, or snack on them with coffee in the afternoon, they always seem to hit the right note. These gluten free bars fit perfectly into that cozy, no-fuss category while still delivering the structure and flavor you want in a layered treat.

The texture is what makes this type of dessert stand out. You get a slightly soft base that holds together just enough, a layer of thinly sliced fruit that breaks down just right in the oven, and a golden crumble topping that adds contrast with every bite. The fact that these bars are gluten free and made without eggs or dairy means they’ll work well for a variety of dietary needs without sacrificing taste or function.
What to Eat With Gluten Free Pear Crumble Bars
These bars are great on their own, but they also pair well with a few complementary sides, especially when serving guests or building out a dessert table. Keep it simple and let the bars stay the focal point while adding flavors or textures that match the season or occasion.
- A small scoop of vanilla or cinnamon dairy-free ice cream
- Unsweetened whipped coconut cream
- A mug of warm chai or orange spice tea
- A drizzle of date syrup over the top
- Toasted walnuts or pecans on the side for added crunch
Each of these additions helps amplify the cozy, spiced flavor of the bars without overwhelming them.

Substitutions
This recipe is pretty flexible if you want to use what’s already in your pantry or adjust for taste preferences. As long as you maintain the dough-to-fruit balance and the moisture content, you’ll still get a firm base and a crisp top after baking.
- Oat flour → sorghum flour or gluten free all-purpose blend
- White rice flour → millet flour or superfine almond flour
- Low carb brown sweetener → coconut sugar or maple sugar
- Coconut oil → avocado oil or vegan butter
- Pears → apples, peaches, or plums sliced thinly
Most soft fruits work well, especially ones that release a bit of juice while baking but won’t make the base soggy.

Storage and Reheating
Once baked and cooled, these bars can be stored in an airtight container in the refrigerator for up to two days. They will soften slightly and lose some of their crispness in the fridge, but the flavor remains intact. Let them sit at room temperature for 10–15 minutes before serving for the best texture. These are not designed to be reheated, as warming them may cause the base to break down.

Why Pear Works So Well Here
Pears often get overshadowed by apples in fall and winter baking, but they offer a unique tenderness and natural sweetness that works beautifully in layered bar desserts. They soften during baking without becoming mushy, which helps them hold structure between the layers.
Sliced thin, they cook through evenly and provide a subtle balance to the spice-heavy crumble without overpowering the other elements. They also bring a bit of moisture that makes each bite feel cohesive without needing a thick sauce or glaze.
These crumble bars walk the line between snack and dessert. They’re easy to assemble, make the most of seasonal produce, and deliver a satisfying balance of texture and warmth. Whether you’re baking for a weekend treat or bringing something to share, this recipe makes a solid choice that won’t require complicated techniques or specialty tools.
Gluten Free Pear Crumble Bars
Ingredients
- 1 ½ cups oat flour
- ½ cup plus 2 tablespoons white rice flour
- ½ cup plus 2 tablespoons low carb brown sweetener
- 7 tablespoons melted coconut oil
- 2 to 3 tablespoons water
- ¾ teaspoon baking powder
- 1 teaspoon ground ginger
- ¼ teaspoon ground nutmeg
- ½ teaspoon salt
- ⅓ cup certified gluten free rolled oats
- 1 pound pears sliced
Instructions
- Grease and line an 8×8 inch baking pan with parchment paper. Preheat the oven to 350°F.
- In a large bowl, combine the oat flour, white rice flour, sweetener, baking powder, salt, ginger, and nutmeg. Stir well to combine.
- Add the melted coconut oil and mix until the mixture becomes crumbly.
- Add two tablespoons of water and stir until a thick, pliable dough forms. Add an extra tablespoon of water only if needed. Let the dough sit for 5 minutes to absorb the liquid.
- Slice the pears into thin slices, about ¼ inch thick. Set aside.
- Set aside one third of the dough in a small bowl. Press the remaining dough evenly into the prepared baking pan to form the base.
- Arrange the pear slices evenly over the dough base.
- Add the rolled oats to the reserved dough and mix with your fingers to form a crumbly topping. Pieces should be no larger than a pea.
- Sprinkle the crumble mixture evenly over the top of the pears.
- Bake for 30–35 minutes, or until the top is golden and the edges are set.
- Remove from the oven and let cool in the pan for at least 20 minutes before removing. Let cool completely before cutting.